User Guide
- What is PlaNUS
- About this document
- Quick start
- Features
- FAQ
- Java 11 Installation Guide
- Command summary
What is PlaNUS
(ZHI LIN) PlaNUS is a desktop application for NUS students to manage their tasks and schedule. With this system, you can add your upcoming tasks into the list, and then display them in a table view or in a calendar view, so that you may easily see and plan your schedule ahead. This application is optimized for use via Command Line Interface (CLI), this means that you operate the application by typing commands into the command box.
This is what PlaNUS looks like:
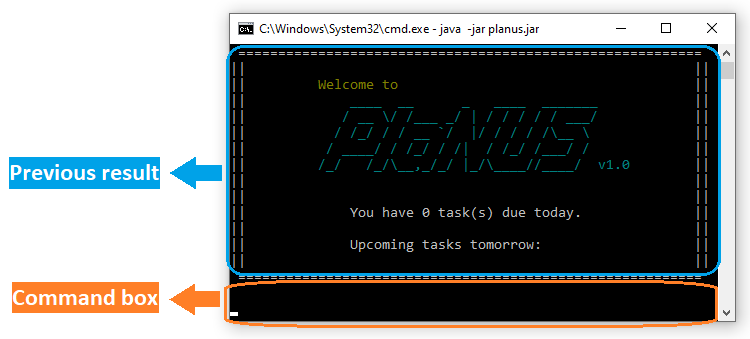
Figure 1. The user interface for PlaNUS.
About this document
(ZHI LIN) This user guide is a document aiming to help users in understanding the features provided by PlaNUS and the instructions required for each step.
Included is a quick start guide, a brief explanation of each features available, as well as a summary of commands for quick reference at the bottom of the document.
Quick start
-
Ensure that you have Java 11 or above installed. To check that if you have Java 11 installed for Windows user, open command prompt by pressing
Windows key + Rand typecmd, then typejava -versionin the command prompt and pressEnter. -
If you do not have Java 11 installed, go here.
-
For first time Windows user, open command prompt and run the following line to enable color display of command prompt:
reg add HKCU\Console /v VirtualTerminalLevel /t REG_DWORD /d 1 -
Download the latest “planus.jar” from here.
-
Open a new command prompt in the folder where “planus.jar” is located at. For Windows user, you can do so by going to the folder in file explorer, and at the location bar type
cmdand pressEnter. -
Run “planus.jar” with the following command:
java -jar planus.jarThe following content will be displayed if there’s no existing data file:
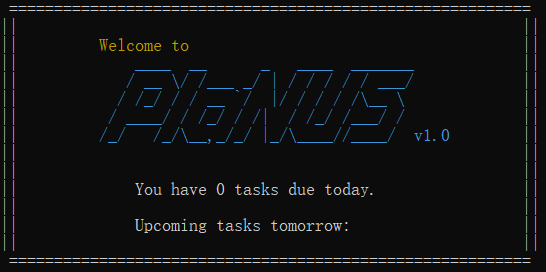
Figure 2. The first thing you will see upon opening the application.
-
Maximise the command prompt window to get a full display of the contents.
-
Type a command in command prompt and press
Enterto execute it. -
Refer to the Features below for details of each command.
Features
Notes about command format:
- Words in UPPER_CASE are the inputs to be supplied by the user while words in LOWER_CASE are the command words.
    - e.g. in "add DESCRIPTION [d/DATE] [st/START_TIME] [et/END_TIME] [p/PRIORITY]",
    add is a command word while DESCRIPTION is a description about the task.

- Parameter in square bracket is optional.
    - e.g. in "add DESCRIPTION [d/DATE] [st/START_TIME] [et/END_TIME] [p/PRIORITY]",
    DATE, START_TIME, END_TIME and PRIORITY are optional inputs which can be omitted.

- Input date format is dd-MM-yyyy.
    - e.g. 20-02-2020 means 20th February 2020

- Input time format is HHmm in 24-hrs.
    - e.g. 1830 means 6.30pm

- Input priority format is 1, 2 or 3 which represents LOW, MEDIUM and HIGH respectively.
    - e.g. 1

- Task index is the number displayed between "#" and description of the task.
    - e.g. "#1029 meeting", 1029 is the index.

- Input reminder format is either on or off, with the time component having the same HHmm in 24-hrs.

- If only the index is entered for the edit command, command will still be valid.
    - e.g. "edit 1028' is valid.
Showing all commands : help
Shows the commands available with the formats.
Format: help
Expected outcome:
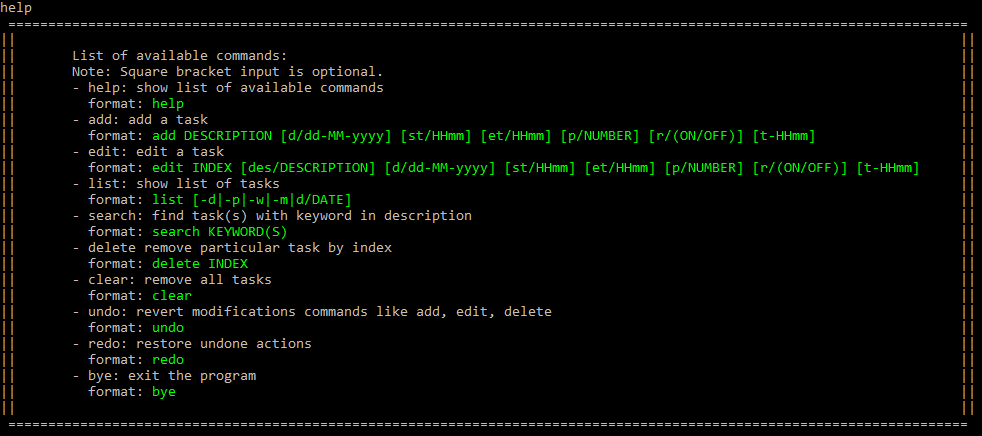
Figure 3. A list of available commands and their formats will be displayed.
Adding a task : add
Add a task to the task list and display task that was added.
If the date and priority are omitted,
default date will be the day when the tasked is added and
default priority will be low. If the timings are omitted, the time displayed will be empty.
A reminder can be set for the task, which will be displayed at a given time. If no time is given for the reminder,
it will be set to its default which is one hour before the start time of the task.
If both are omitted, an error is given.
Format: add DESCRIPTION [d/DATE] [st/START_TIME] [et/END_TIME] [p/PRIORITY] [r/ON|OFF] [t-REMINDER_TIME]
Example of usage:
add meeting st/1000
add borrow book
add Movie st/1700 et/1900 p/3 r/on t-1530
Expected outcome:

Figure 4. After adding “meeting” starting at 10.00am.

Figure 5. After adding “borrow book” with no other inputs.

Figure 6. After adding “Movie” with starting time at 05:00pm, end time at 07:00pm and priority HIGH with a reminder set for 3:30pm

Figure 7. After the reminder has reached the specified time
Editing a task : edit
Edit a task in the task list using its index and display the task edited.
Format: edit INDEX [des/DESCRIPTION] [d/DATE] [st/START_TIME] [et/END_TIME] [p/PRIORITY]
Example of usage:
edit 875 des/reading
edit 4075 st/1400 et/1600 p/3
edit 875 r/off
Expected outcome:

Figure 8. Initial list before edits.

Figure 9. After editing the description of task #875.

Figure 10. After editing the timings and priority of task #4075.

Figure 11. After editing the reminder of task #875 to off.
Displaying tasks : list
Default/no suffix: display all tasks in the order of their addition.
-d: display all tasks by date, from oldest to newest.
-p: display all tasks by priority, from HIGH to LOW.
-w: display only tasks in current week in a weekly view.
-m: display only tasks in current month in a monthly view.
d/DATE: display all tasks under a specified date in order of their addition.
Format: list [-d|-p|-w|-m|d/DATE]
Regarding the format, ‘|’ means “or”, thus the suffix can either be -d, -p, -w, -m, or d/DATE.
It can also be nothing since square brackets denote optional.
Under partial display modes like daily, weekly and monthly view,
you could enter q, w and e to quit, view previous and next period respectively.
Example of usage:
list
list -d
list -w
list d/20-10-2020
Expected outcome:
list:

Figure 12. Default list, tasks are in order of their addition to the list.
list -d:

Figure 13. List tasks by date, from oldest to newest.
list -p:

Figure 14. List tasks by priority, from HIGH to LOW.
list -w:
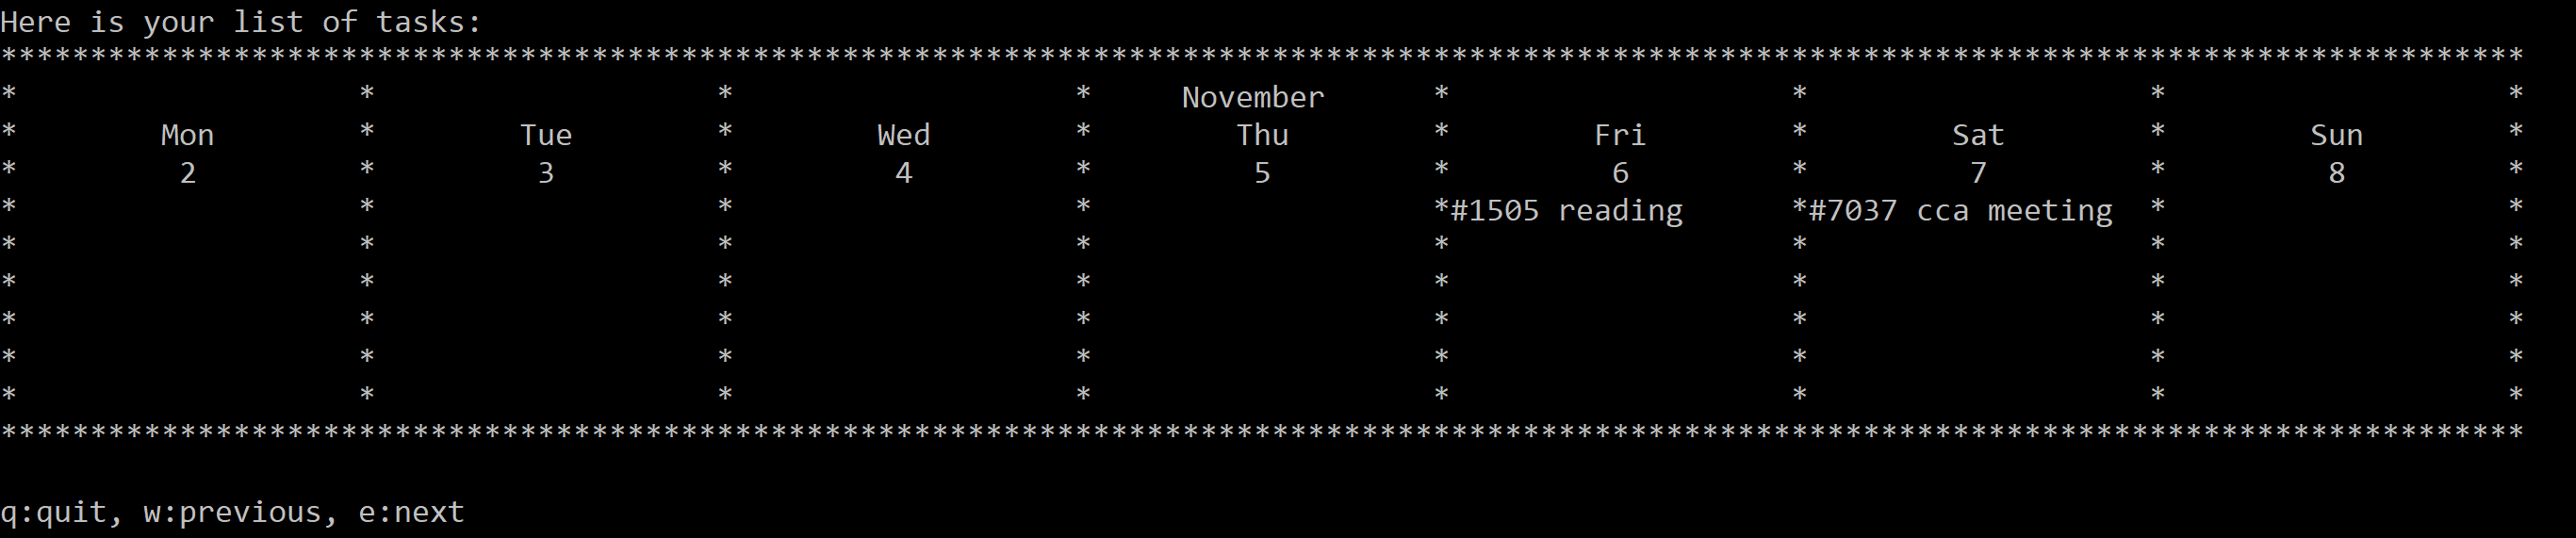
Figure 15. Display tasks in a weekly view for the current week.
list -m:
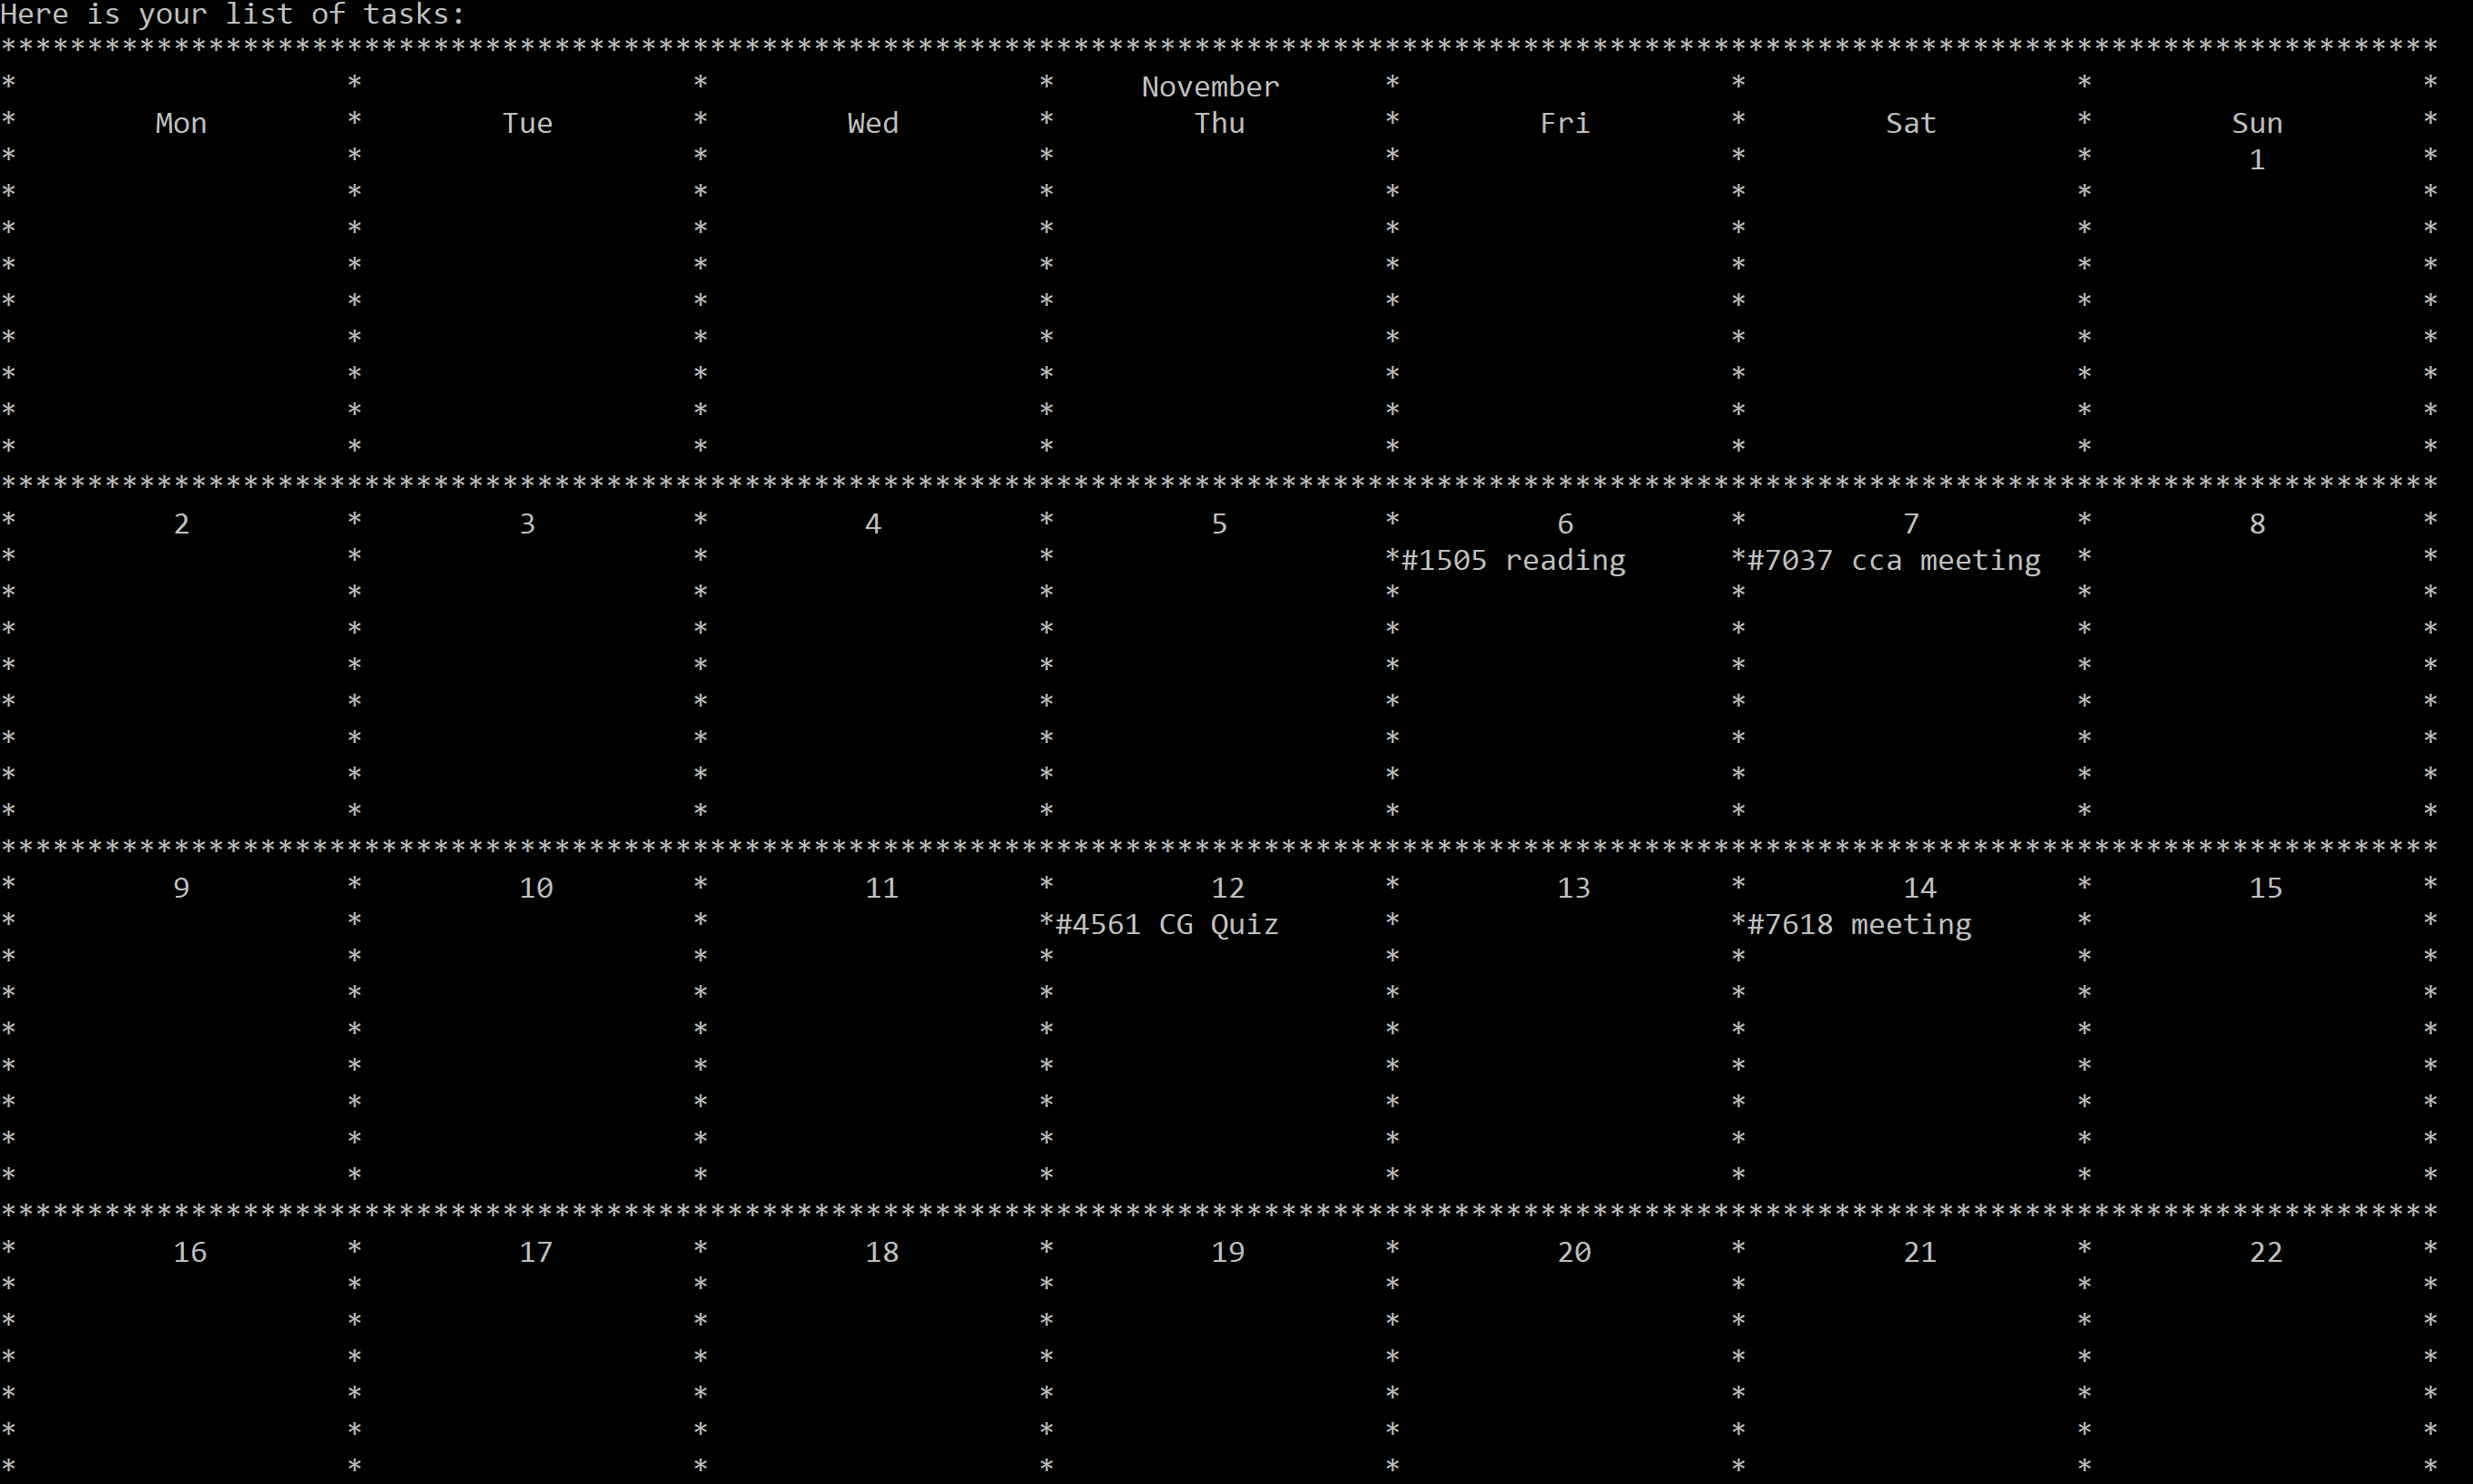
Figure 16. Display tasks in a monthly view for the current month.
When viewing tasks by the list -w or list -m, monthly or weekly view , then the user will
be in the display mode and can view tasks in the previous and month/week using e for the next
month or date and the commandw to view the previous month/week. The user can quit the display mode
by typing in the command ‘q’ to quit display mode.
Searching relevant task(s) : search
Search and display task(s) with given keyword, keywords do not have to be case-sensitive.
Format: search KEYWORD
Example of usage:
search meeting
Expected outcome:

Figure 17. A list of tasks containing the keyword will be displayed.
Removing a task : delete
Delete a task from the task list using its index and display the task deleted.
Format: delete INDEX
Example of usage:
delete 7369
Expected outcome:

Figure 18. The task that was deleted will be displayed.
Clearing tasks : clear
Delete all tasks in the list.
Format: clear
Expected outcome:
All tasks cleared.

Figure 19. The task that was deleted will be displayed.
Undo : undo
(ZHI LIN)
Undo the previous action and display a message.
Only modification commands can be undone: add, edit, delete, clear
You can undo until the data is the same as what the current session started with.
Format: undo
Expected outcome:
In this case, the previous action is add CG2028 final quiz d/11-10-2020 st/1600 et/1700 p/3.
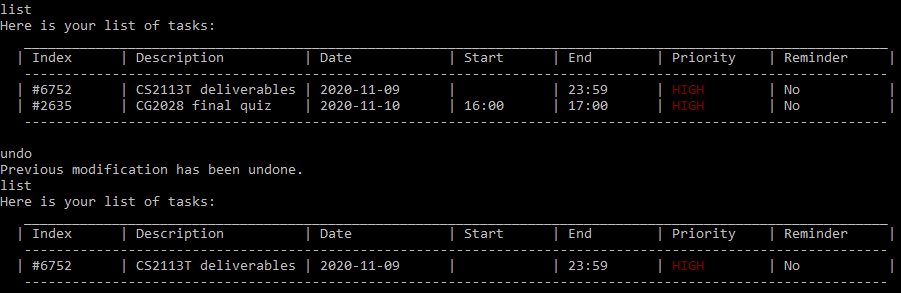
Figure 20. List of tasks before and after the undo command.
Redo : redo
(ZHI LIN)
Reverse the undo command and restore the previous action. This command can only be executed if at least one action has been undone.
Format: redo
Expected outcome:
In this case, the previous action add CG2028 final quiz d/11-10-2020 st/1600 et/1700 p/3 was undone.
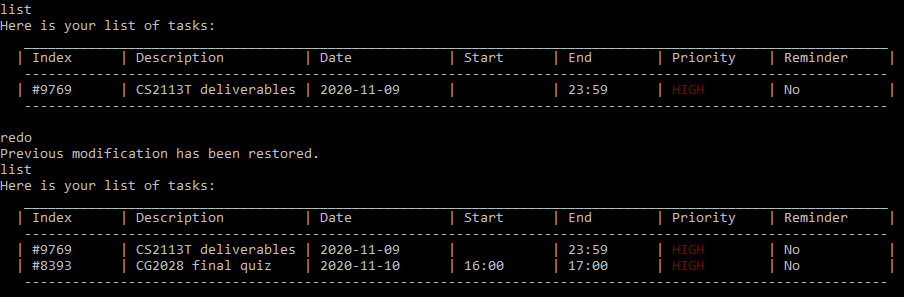
Figure 21. List of tasks before and after the redo command.
Exiting program : bye
Display a goodbye message and exits the program.
Format: bye
Expected outcome:

Figure 22. Exit message.
Saving data to file
Data will be automatically saved after modification commands like
add, delete, edit and so forth.
The data is saved in a file called data.jason which can be found in the folder named
data in the same location as the PlaNUS jar file. If you are moving over to a new device and
wish to carry over your tasks from the previous device, then simply copy over the data folder into the
new device in the same location as the jar file and you’ll have your tasks over
in no time.
FAQ
Q: How do I transfer my data to another computer?
A: Copy the existing data file to the computer, then create a “data” folder under the same folder as “planus.jar”. Lastly, copy the data file to “data” folder and name it “data.json”.
Q: There is an error and I cannot open the application.
A: Check that your Java version is 11. Press Windows key + R, type cmd and press Enter.
In the command prompt, type java -version and press Enter to see your Java version.
If the version is not correct, go here.
Java 11 Installation Guide
(ZHI LIN)
-
Click here to go to the download page for Java 11 JDK. Click on the download link with zip file corresponding to your operating system.
-
Create a new folder named “Java” in your C drive and extract the contents of the zip file there.
-
Go to LumiNUS under the CS2113T module, go to “Files”, in the “Resources” folder, download SwitchJava.bat and SwitchJava.sh and move them to your created “Java” folder.
-
For Windows user, open command prompt in the “Java” folder by typing
cmdat the location bar of the file explorer, and run the batch file by typingSwitchJava.batand pressEnter.
Command Summary
| Action | Format | Example |
|---|---|---|
| add | add DESCRIPTION [d/DATE] [st/START_TIME] [et/END_TIME] [p/PRIORITY] [r/(ON/OFF)] [t-REMINDER_TIME] |
add meeting st/1400 |
| edit | edit INDEX [des/DESCRIPTION] [d/DATE] [st/START_TIME] [et/END_TIME] [p/PRIORITY] [r/ON|OFF] [t-REMINDER_TIME] |
edit 1234 p/3 |
| list | list [-d|-p|-w|-m|d/DATE] |
list -d, list d/10-10-2020 |
| search | search KEYWORD |
search meet |
| delete | delete INDEX |
delete 212 |
| clear | clear |
clear |
| undo | undo |
undo |
| bye | bye |
bye |